 View
Excel Output Format Properties
View
Excel Output Format PropertiesThis article explains how you can view or change the properties for a ClicknDECiDE Vision Excel Output format.
Note: You do not need to start Excel to use the Excel format in the Output Format Configuration console. This format can create an Excel file on the disk and append data to an existing file. The file must not be used by another application when sending data to it. All the attributes such as color, font, font weigh, border and so on are sent to the Excel file. This feature does not exist with the Excel DDE output format.
What do you want to do?
 View
Excel Output Format Properties
 Change Excel Output Format Properties
 Change
Excel Output Format Properties on the Format Tab
 Change
Excel Output Format Properties on the Options Tab
 Learn
about Break Levels in the Excel Output Format
View Excel Output Format Properties
To view Excel Output Format Properties, perform the steps below:
Select the Excel output format you want to modify.
Either double-click the Excel output format or right-click the Excel output format, and click Properties...
Change Excel Output Format Properties
To change Excel Output Format Properties, perform the steps below:
Select the Excel output format you want to modify.
Either double-click the Excel output format or right-click the Excel output format, and click Properties...
Select the tab as appropriate:
Change Excel Output Format Properties on the Options Tab
The Options tab is specific to the Output type format and allows to specify certain parameters used when choosing that format to export data:
File Directory: the default file directory to use when creating or searching an Excel file.
Default Extension: the default file extension to use to create an Excel file if the user does not specify an extension.
File Filter: the File Filter to display when choosing the Excel format to export data.
For example: Worksheet Files (*.xls)|*.xls|| will be the filter used when exporting data to an Excel format and will display the text "Worksheet Files (*.xls)"as the target file name in the Open dialog box. This will be the text in front of the "|" (pipe)character. The *.xls extension will be used. This is the extension specified between the first "|" and the second one. The list must finish with a double-pipe "||".
Default Excel Version: the default Excel version to use to create a new Excel file. The following versions are available:
Excel 95 format: limited to 16000 rows.
Excel 97/2000 format: limited to 65536 rows.
Model: the default model to use to send data to the new Excel file. The model is optional. If you specify a model, the corresponding Excel file will only be copied and used when sending data to the destination Excel file if you create a new Excel file.
For example, if you specify the following file as a model: ModelExcel.xls, located in the ClicknDECiDE Builder Sample or DemoWeb directories, and if you send data to a new Excel file TEST.xls, a new Excel file TEST.xls will be created. However, the content of the TEST.xls file will be based on the ModelExcel.xls model with the data sent from the specified cell. The logo, fonts, font weight, borders, colors and other attributes specified in the model file will be used in the TEST.XLS file. If the Model contains graphs, macros or formula, they will appear in the new Excel file created. Note that these Models can also be used in ClicknDECiDE EBIS and ClicknDECiDE ClicknDECiDE Web Menu for any Excel output format.
Default Sheet Name: the sheet name to be used by default when creating a new Excel file. The default sheet name depends on your Regional Options, for example:
Sheet1 for English Excel
Feuil1 for French Excel
Tabelle1 for German Excel
Hoja1 for Spanish Excel
Foglio1 for Italian Excel.
When creating a new Excel file, you can customize the sheet name and replace Sheet1 with Budget for example.
Cell[Mode] by default: the destination cell and write mode by default to use to send data to the Excel file.
The Write Mode, entered between square brackets, is optional and can take the following default values (which must always be written in English):
[ERASEFILE]: to delete the destination Excel file if it exists and create a new one using a Model if defined.
[ERASEDATA]: to keep the destination Excel file but remove all the data from all the rows in the destination Sheet, without modifying the other sheets.
[REPLACE]: to add data to an existing Excel file by partially or totally replacing existing data, from within the destination cell in the specified Sheet.
[INSERT]: used to add data to an existing Excel file by inserting rows from the destination cell. Existing data in the destination cell or below the destination cell is kept but moved to the base of the same Sheet.
If you define the Write Mode here, then the Export dialog box will be given a default presentation when choosing the destination Excel file. For example, if you enter A4[ERASEFILE] the Export dialog box displayed when sending data to Excel will offer the Erase Action with the Delete the file before data export check box selected.
When choosing a destination Excel file, the following options must be specified:
Pathname and the destination Excel file name with or without an extension. If an extension is not specified, the default extension specified will be used.
Destination Tab in the Excel file (Sheet1 by default for an English Excel). The Tab can exist or be created.
Destination cell.
Action from among the following:
Erase: if the Erase check box is selected then the Delete the file before data export check box will appear under the Action box. If the Enable check box is clear, the Excel file will be deleted, then recreated and data will be sent to the destination sheet and cell. If a Model has been defined, it will be used when creating the new Excel file. (Corresponding to the ERASEFILE mode previously defined). The data will be sent to the destination sheet and cell but all the data will first be removed in the specified Sheet before writing the new data. If a Model has been defined, it will not be used because it is not a new Excel file (this option corresponds to the ERASEDATA mode above).
Replace: data will be sent from the destination cell and will either partially or totally replace the existing data. If a Model has been defined, it will not be used because it is not a new Excel file (this option corresponds to the REPLACE mode above).
Insert: data will be sent from the destination cell using the INSERT mode, new rows will be inserted and old data will be moved down the sheet. If a Model has been defined, it will not be used because it is not a new Excel file (this option corresponds to the INSERT mode above).
Set Headings: if the Set Headings check box is selected then the destination starting cell will receive the heading text. If the Set Headings check box is clear then the destination starting cell will receive the first data row if that option is disable.
Learn about Break Levels in the Excel Output Format
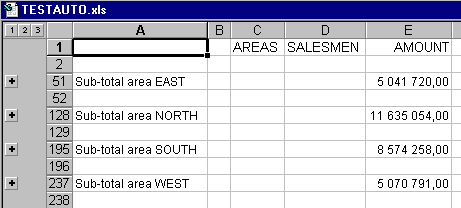
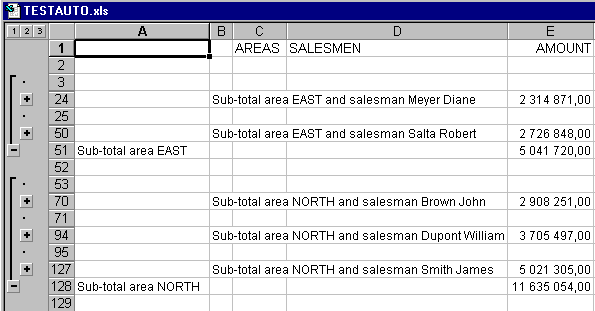
It is possible to export reports with break levels in ClicknDECiDE Builder to Excel and perform drill-downs on the report data in Excel.
Note: it is very important to keep all the blocks visible in the report to enable the break levels to be displayed in Excel, especially the detail block. It is recommended to create a Header block and a Footer block for each break level.
For example:
It is possible to click on the 1, 2 and 3 buttons to display each level, or click on the plus sign '+' to expand a specific level.


|
See Also |
