Add a Break Level (Field Group)
![]()
This article explains how to add a break level in a report.
What do you want to do?
![]()
 Export
a Report with Break Levels
Export
a Report with Break Levels
![]()
To view the Break Levels (Field Group) defined for a report, perform the following steps.
Note: to define correct break levels, the fields used in the break levels must be sorted and it is recommended to position them in the same order as the selected fields.
Click
the Field Group icon  in the toolbar or select View
> Field Group. The Field Group
dialog box appears displaying the Break Levels defined in the report.
in the toolbar or select View
> Field Group. The Field Group
dialog box appears displaying the Break Levels defined in the report.
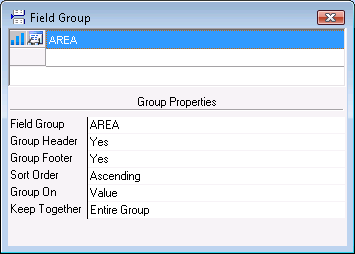
Note the Break Level properties and modify them as appropriate.
To add Break Levels (Field Group) to a report, perform the following steps.
Note: to define correct break levels, the fields used in the break levels must be sorted and it is recommended to position them in the same order as the selected fields.
Click
the Field Group icon in the toolbar or select View
> Field Group. The Field Group
dialog box appears displaying the Break Levels defined in the report.
Click
the empty line in the top pane of the Field
Group dialog box to add a new Break Level.
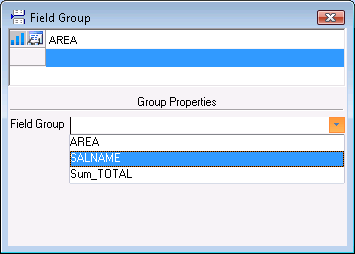
Select
the field name to be used in the break level (SALNAME in this example).
Note: the drop-down list displays the available query field names in the order in which they
were selected.
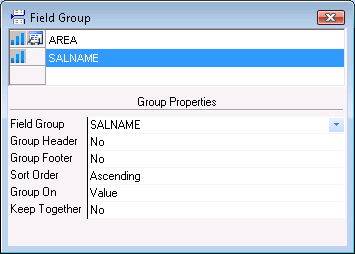
Double-click the Group Header text box and click Yes to display a header block for the break level.
Double-click the Group Footer text box and click Yes to display a footer block for the specify if you want to display a footer block for the break level.
Double-click the Sort Order text box and select either an Ascending or Descending Sort Order as appropriate.
Double-click the Group On text box and select either
Value or First
Char as appropriate.
Value: defines the break on the entire Value.
First Char: enter the number of characters to be used in the
break level in the Range text
box. For example if a post code is set for five characters, you could
enter a break level on the first two characters.
Double-click the Keep Together text box and select one
of the following three options:
Entire Group: inserts a break page if the entire group does
not fit on the same page before starting to edit or print the result.
With First Detail: starts to edit or print the beginning of
the group on a page only if the first detail can be edited or printed
before a page break.
No: the group does not need to be kept together.
Export a Report with Break Levels
Report data can be exported to any output format. It is also possible to enable drill-downs if you export the report to Excel.
|
See Also |

