Specifying the join condition (Insert menu) or Table tab (View menu)
See also:
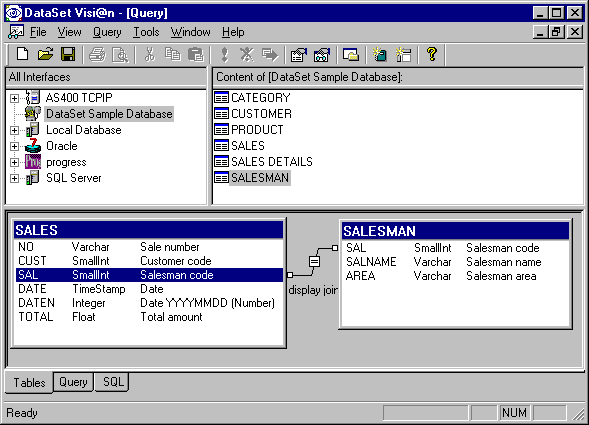
Specifying the Join Conditions:
If more than one table has been added in the Tables Tab, it is recommended to define the join condition and join type:
1. Select the field to be joined in the first table.
2. Keep the mouse button pressed and go to the field to be joined in the second table.
3. Drop the mouse button.
A line appears with an equal sign in a small square. That line should link the 2 selected tables, going from one field in the first table to another field in the second table. Both fields must have the same type and are supposed to be the join condition between the 2 tables.
Specifying or changing the Join type and Join criteria:
1. Double-click on the small square displaying the default equal sign.
2. In the Join properties dialog box, choose a join criteria (=, <>, >, <=, <, or >=) to set up the relationship between the two fields. Most of the time, the equal sign has to be used by default.
3. Choose a join type (Type 1, 2, 3 or 4) to set up the relationship between the two tables if supported by your database.
4. Confirm by clicking on <OK>.
Removing a Join Statement:
1. Highlight the join statement between two tables by clicking on the small square having the equal sign.
2. Press the DEL key on your keyboard.
Going to the Query tab: once the required tables are selected and the required join statements defined, click on the <View> <Query> command or on the Query tab to build your query.
Tips : note that by clicking on the text "Click here to display joins list" in the bottom window in the Table Tab, a title bar named "Joins Relations" is displayed. Selecting that bar with the mouse cursor will open a new window allowing to add or remove join conditions with an easier way if many tables are involved. Nevertheless the join type and criteria type can only be modified using the previous way. (Double click on the small square with the equal sign).
See also: