![]()
A query is a request for data results, for action on data, or for both. You can use a query to answer a simple question, to perform calculations, to combine data from different tables and so on. Queries that you use to retrieve data from a table or to make calculations are called select automatic queries in Data Set Vision.
You can use a query to supply data for a form or report. In a database, the data that you want to present by using a form or report is often located in several different tables. By using a query, you can assemble the data that you want to use before you design your form or report.
What do you want to do?
![]()
 Change
the order of selected fields
Change
the order of selected fields
Open
the ClicknDECiDE SQL Editor
![]()
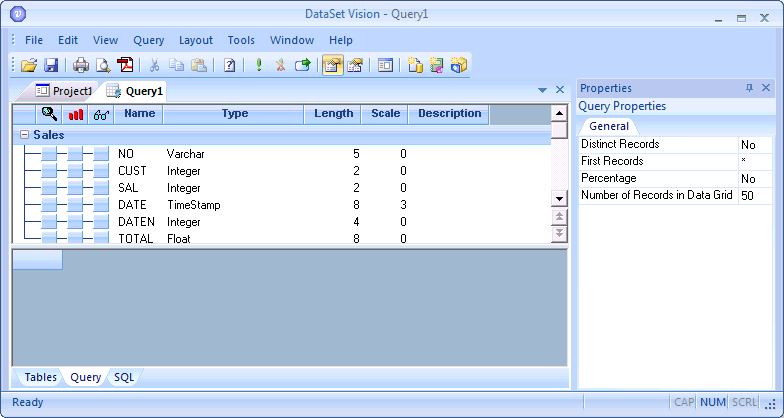
The Query tab displays from left to right:
 Criteria icon: enables the user
to configure criteria.
Criteria icon: enables the user
to configure criteria.
 Sort icon: sort the data in ascending
or descending order.
Sort icon: sort the data in ascending
or descending order.
 Selected Fields icon: enables
the user to select, hide or clear a field's selection.
Selected Fields icon: enables
the user to select, hide or clear a field's selection.
Name: the field name
Type: the field type
Length: the field length
Scale: the field scale
Description: the field description.
Each table appears with a minus sign to the left of the table name. The minus sign enables you to collapse the table. The plus sign enables you to expand the table and view all the fields. That minus sign allows you to expand or not the table structure. When a plus sign appears, you see only the table name, click on the plus sign to expand the table structure.
The lower pane of the Query tab diplays the Data Grid area
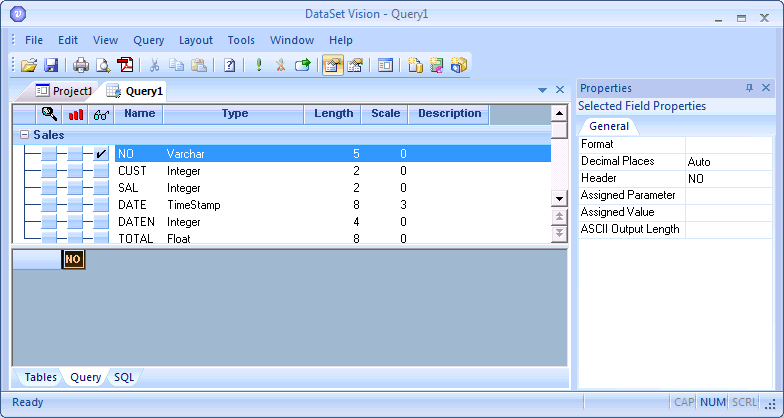
To
select a field click
the blue button under the Selected Fields icon. The blue button will appear selected
 and the field will be added to the data grid in the lower pane. To run
the query on the screen click the Run
icon or Query>
Run.
and the field will be added to the data grid in the lower pane. To run
the query on the screen click the Run
icon or Query>
Run.
Note: if no fields have been selected and a query is run, all the fields will be selected by default.
If you only want to review the data from certain fields, you can do so via the Query button or the commands File> New> Query in a Project or a Query and Report tabs or Insert> Query.
Suppose that you want to review a list of customers, the dates of sales and the total sales amounts. You can create a query that returns the customers, sales dates and totals sales amount information by using the following procedure:
Click the New Query button or the commands File> New> Query in a Project or a Query and Report tabs or Insert> Query.
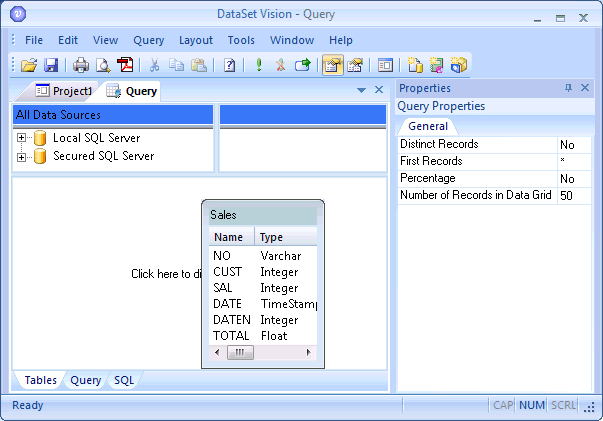
Click the expand sign as many times as necessary to access the table you want to use to build the query. For more details, click here...
Select the table and perform a drag-and-drop operation to slide it into the lower pane. In this example, we have selected the Local SQL Server> ClicknDECiDEReport data source's Sales table. For more details, click here...
Click
the Query tab. The new query opens
displaying the Sales table's fields in the upper pane.
Click the blue button under the Selected Fields (glasses) icon to select the CUST field. The blue button will appear selected and the CUST field will be added to the data grid in the lower pane.
Click the blue button under the Selected Fields (glasses) icon to select the DATE field. The blue button will appear selected and the DATE field will be added to the data grid in the lower pane.
Click the blue button under the Selected Fields (glasses) icon to select the TOTAL field. The blue button will appear selected and the TOTAL field will be added to the data grid in the lower pane.
Click Run or Query> Run to run the query. The query runs, and then displays all the information selected in the data grid in the lower pane.
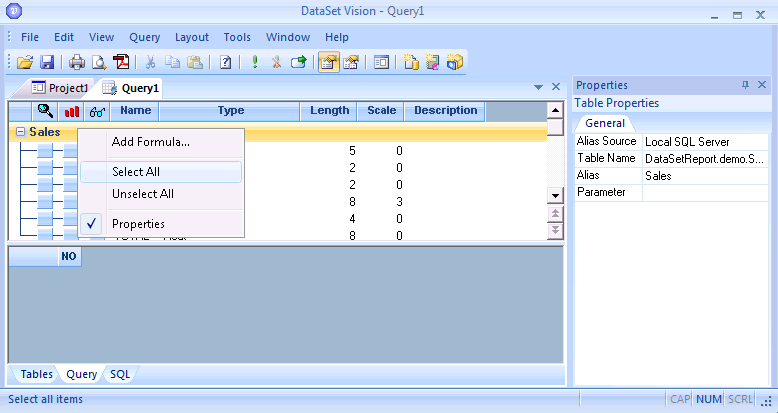
There are three ways to select all the fields in a table:
Right-click the table bar (in this example Sales) and click the Select All command.
Double-click the table bar and all the fields will automatically selected.
Run a query without selecting any fields, and all the fields will automatically be selected and inserted in the data grid in the lower pane.
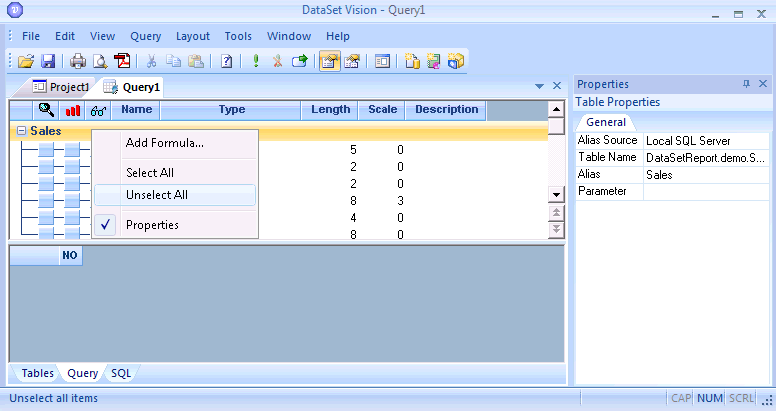
To unselect (clear) all the fields selected, right-click the table bar (in this example Sales) and click the Unselect All command.

To unselect (clear) a field selected, perform the following steps:
Right-click the blue button under the Selected Fields (glasses) icon to the left of the field you want to select. The context menu appears.
Click Select> Off. The field will be removed from the data grid in the lower pane and the blue square to the left of the field name will be cleared.
Note: alternatively, select the field in question in the data grid and press the DELETE key to remove the field.
To hide a field, perform the following steps:
Right-click the blue button under the Selected Fields (glasses) icon to the left of the field you want to hide. The context menu appears.
Click
Select> Hidden. The tick in
the blue button will be dimmed .
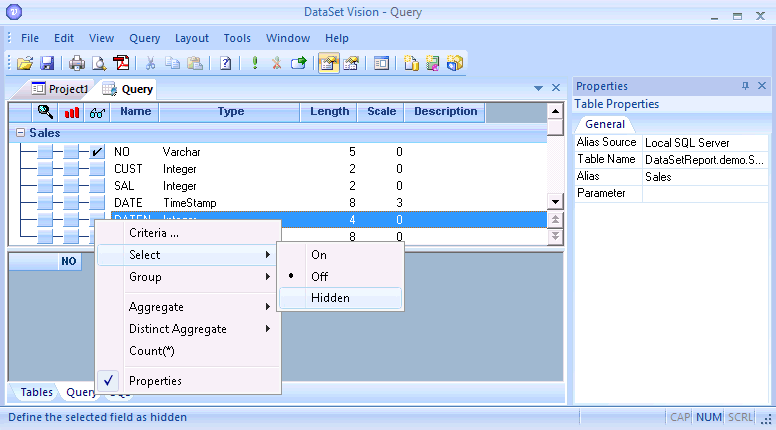
Note that the field will not be displayed in the query result but can be used in an SQL statement without seeing its value (for example in a Group By statement).
To show a hidden field, perform the following steps:
Right-click the hidden field in question.
Click
Select> On or
Select> Off.
Change the Order of Selected Fields
To change the order of selected fields, perform the following steps:
Select the field you want to move in the data grid.
Hold down the left mouse button and perform a
drag-and-drop operation to move the field to the new location in the data
grid.
Release the left mouse button. The SELECT statement will automatically be modified in the SQL Editor.
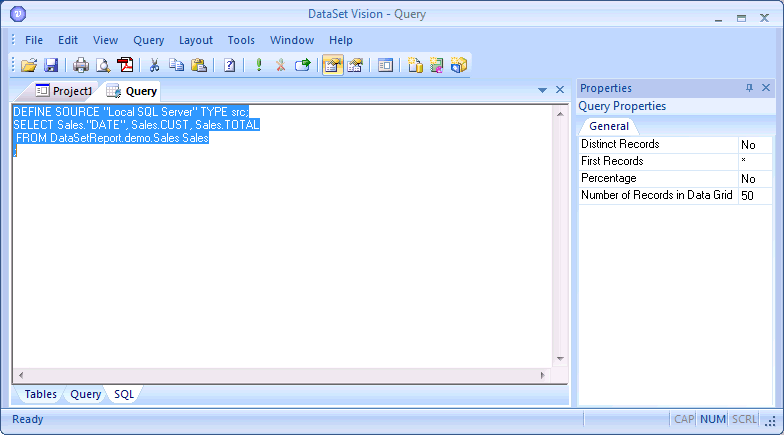
Open the ClicknDECiDE SQL Editor
If you want to see how ClicknDECiDE Builder automatically translates your query definition into an SQL Command, open the ClicknDECiDE SQL Editor by performing the following steps:
Click the SQL tab or click View> SQL. The SQL tab appears.
To return to the Table tab, perform the following steps:
Click the Table
tab or click View> Table.
Modify the selected tables or join conditions as appropriate.
|
See Also |

