 Create
a parameter
Create
a parameterA parameter query prompts you to provide data or information before the query is run. For example, you could query your database to show you the sales you have generated in the month of your choice. Each time you run the query, you will be prompted to identify the month that interests you.
Using a parameter in a query is as easy as creating a query that uses criteria. You can design a query to prompt you for one piece of information, such as a part number, or for more than one piece of information, such as two dates. For each parameter, a parameter query displays a separate dialog box that prompts you for a value for that parameter. A parameter will be a modifiable criteria whose value(s) is defined when running the query.
You can define one or several parameters to feed the criteria on selected or unselected fields. It is possible to create a parameter automatically if, when the user enters a value, they use the following option Create a Parameter for Values by clicking the arrow to the right of the text entry field.
What do you want to do?
To create a parameter, follow the steps below:
Select
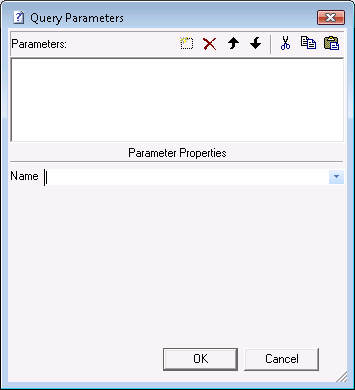
Query> Parameters. The
Query Parameters dialog
box appears.

Enter a Name for the new parameter (in this
example CODE for a customer code).
Note: avoid using spaces, special
characters or reserved words for the parameter name. If the name contains
spaces, special characters or corresponds to a reserved word ClicknDECiDE Builder
will add straight quotation marks to the parameter name in a formula.
Note: if you created parameters
for the whole project, a combo box enables you to select
one of them. However, this parameter can only be modified via the Parameter dialog box for the project.
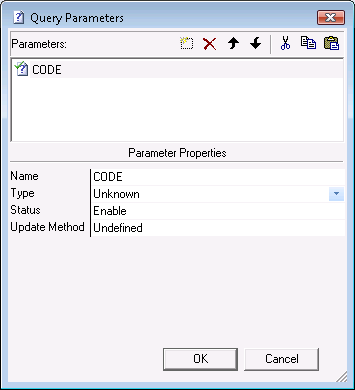
Press ENTER to add the new parameter in the top window of the Query Parameters dialog box. The Type, Status and Update Method Parameter Properties are displayed for you to define.
Select the Type (the default Type is Unknown),
you can select amongst the following types: String, Numeric, Date, Time
or TimeStamp, according to the field type that will use you new parameter
as a criteria.

Select the Status for the new parameter. Two options
are available: Enable or Disable. A parameter with the Disable status
will not be prompted.
Note: if you select the Disable status for the parameter, ensure
you remove it from the Criteria
dialog box, as it could cause an error in the SQL syntax.
Select the Update Method (by default the Update
Method is undefined), choose amongst Value(s),
Input, Input
List, Input Query List, Formula
or Query.
Note: if the Update
Method is an Input List or an Input Query list, you can decide
if the parameter can be modified
or not. If it is not modifiable, the user can only choose a value from
the proposed list.
Enter a Title for the dialog box which will be used later to feed the parameter if a question must be prompted.
Select whether the parameter is Mandatory or not. If a parameter is mandatory the IGNORE button will not be available for the end user.
Enter a Default Value if this option is available. This will be prompted by the Input, Input List or Input Query List if the parameter is modifiable or will be highlighted in the list if the parameter is not modifiable. To enter several values, separate each value with a semicolon ;. The default value can be the result of a formula.
Select whether
several values are accepted or not, choose amongst Single, Multiple or
Extended selection options (All, Single, Multiple
or Extended).

Note: according to the situation,
you can do the following:
- Enter the list of values manually, separating each value with a semicolon
;.
- Specify the ASCII List file to be used.
- Specify the ClicknDECiDE Builder query to be used.
Select the order
you want the parameters to be asked in by clicking the  Up
and
  Down
arrows if more than one parameter has been defined.
The input for each parameter will be displayed in the chosen order from
top to bottom in the list.
Note: the three icons  Cut,
Cut,
 Copy
and
  Paste
enable users to copy parameters from one query to another.
Click OK
to validate
To use a parameter as a criteria, perform the steps below:
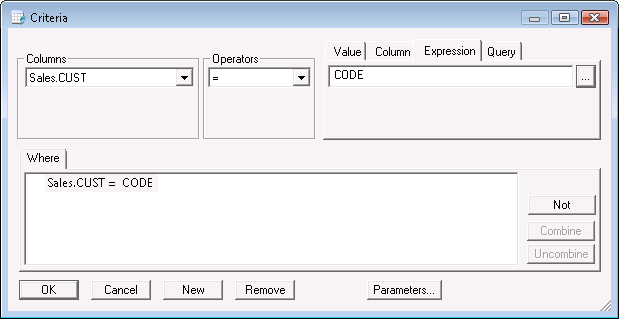
Select Query> Criteria. The Criteria dialog box appears.
Select the required column from the Columns drop-down list.
Select the appropriate Operator.
Select the Expression Tab.
Enter
the parameter name or use the browse button to open the Quick Expression dialog box, select the Parameters tab and double-click the
previously defined parameter and click OK.

Click OK.
Click
 Run
to run the query. The parameter value will be prompt according to the
chosen Update Method.
 Top
of Page
|
See Also |
|
|
